6 min to read
Powershell Universal Component
This is a blog all about Powershell Universal and a new custom component that I have developed for this awesome bit of software
Welcome
Many thanks for clicking on the link to read this blog. I don’t want to ramble as it has been a bit of a delay in writing this blog. Obviously as you know there has been an awful virus COVID-19 and it has had a lot of knock-on effects for the whole of planet earth it seems. One of these effects has been me not blogging, and well there has been good reasons for this, but I don’t want to ramble on. So I have been trying to use Powershell Universal (PSU) as much as possible, although as I have working dashboards in UD, I have still not converted these to PSU. I have been mainly using PSU for the automating of Powershell tasks, which has proved really useful the fact other team members can easily get access to these jobs and the output. I think about 7 months ago, Adam Driscoll was kind enough to write a blog on how to build custom components for PSU. As I have now created over a 100 custom components for UD which also work in PSU, I thought I would sit back and watch the influx of new custom components get built by others…well sadly that didn’t seem to materialise or not yet anyways. I have been more involved in the PSU forum of recent, as a few people had asked about exisiting components which I had built. And well it got me thinking, it’s been a long time since I built any custom components, and well there are still plenty more awesome react components out there that have not been added into PSU. So as I advised in the course I did for building custom components for UD, go for something simple. Don’t try and build the most complex component out there for your first attempt as it will probably not go too smoothly, and might put you off ever trying again. So this blog today will cover this new custom component and how to use it in your dashboard.
Finding the component
Well normally as mentioned in previous blogs I go to npmjs.com which is like google but for react components. However I was just flicking through some other websites demonstrating components, and followed a link to npmjs which showed me the component I wanted to build as it looked a really nice UI addition to add to PSU. So after reading through the documentation for the component and studying the really useful blog Adam Driscoll wrote here I was ready to get building. Well what a difference the timing in building a component takes in PSU. I remember it taking a long time on my laptop, like maybe 10-15 minutes to complete the whole build, on my work PC which has PSU install this took 26 seconds to build! I was like no-way, but yes-way this process only takes seconds to build and complete the process. So now I had a working component in PSU it was time to customise all the parameters and the main JSX file to represent these changes, as I had just used the sample code from the playground to make sure this component would work.
What parameters did you add?
So here is the function which runs this component, and from this you will be able to see all the parameters I included for this component, and what they do, as I have added a comment-line to each parameter. I also advise you reading the npmjs page for this component as that is the official page if any of these parameters should not make sense.
Parameters Used
function New-UDTrendLine {
    param(
        [Parameter()]
        [string]$Id = (New-Guid).ToString(), #Allows you to specify an ID for the component
        [Parameter()]
        [switch]$Smooth, #Switch to defines if the trendline should be smooth or have points
        [Parameter()]
        [switch]$AutoDraw, #Switch needs to be included to animated the trendline
        [Parameter()]
        [int]$Duration, #Integer value in milliseconds to define animation length 3000 = 3seconds
        [Parameter()]
        [ValidateSet('linear','ease','ease-in','ease-out','ease-in-out','step-start','step-end')]
        [string]$AnimationType = 'ease-out', #A validated choice set of animations
        [Parameter(Mandatory = $true)]
        [array]$Data, #This parameter is mandatory and is an array of numbers
        [Parameter()]
        [array]$Gradient = @('#f72047', '#ffd200', '#1feaea'), #Colours for your trendline
        [Parameter()]
        [decimal]$Radius = 12.3, #A decimal value to specify the radius
        [Parameter()]
        [decimal]$StrokeWidth = 2.2, #A decimal value to specify the width of the trendline stroke
        [Parameter()]
        [ValidateSet('butt','square','round')]
        [string]$StrokeEnd = 'square' #Validated set of how the end of the trendlines should look
    )
So how do I use it in my dashboard?
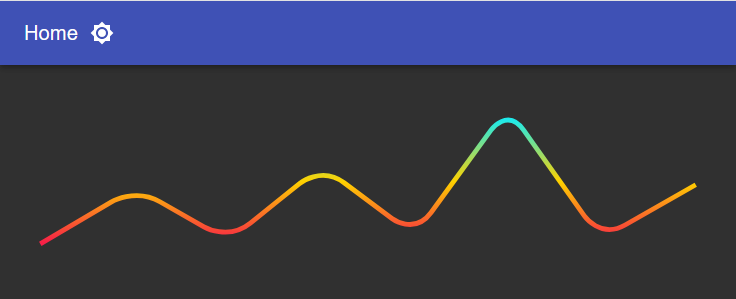
Here is some demo code to show this working in a PSU dashboard
New-UDTrendLine -ID "TRENDLINE" -AutoDraw -Radius 4.5 -StrokeWidth 1.1 -Duration 5000 -Data @(3,33,4,45,7,77,5,34) -Gradient @('purple', 'violet')

The nice thing about this component is it accepts, both named colours, and HTML colour codes. The other nice thing about this component is it looks great in either light or dark themed dashboards.

Or to use the same -data but different parameters to get a totally different look:-
New-UDTrendLine -ID "TRENDLINE" -AutoDraw -Smooth -StrokeWidth 2.1 -Duration 5000 -Data @(3,33,4,45,7,77,5,34)

Once again this same data trendline looks great in either light or dark mode
It’s simple but has a really nice effect on the page, and automatically resizes to the page width, I did not include the height and width parameters for this component, as mentioned on the component page, you can control this by the size of the container you put it in. As in you create a new coloumn choose the size of that column and nest the component inside that. I am personally thinking about using this trendline component to display the amount of times the user has actually visited the dashboard, as I think that would be a nice feature to add to any dashboard.
Conclusion
Well now I smashed my first PSU component, I will look to upload this to the powershell gallery to share with everyone. I will also be looking to build more custom components for PSU. Finally I will be adding this new method of building custom components to my existing video course I released at the end of last year, to try and entice more people into building custom components. So keep an eye out on the marketplace to see this new component in all its glory.
Thank you for reading my blog.